Active directory authentication for CentOS is quite easy to configure. Active directory is a central authentication system and organisations all over the world have relied on it for years. This is super easy to set up for your Windows and Mac desktops but is sometimes a little harder with a Linux workstation. This is all done on a CentOS 6.5 minimal install with nothing but a LAMP stack installed.
There are is one step you need to take to get your machine ready for configuration. Install the following packages, if they aren’t already.
# yum -y install authconfig krb5-workstation pam_krb5 samba-common oddjob-mkhomedir
This will install everything you need to get up and running. There is two ways you can configure the authentication. From the command line (authconfig) or via a console GUI (authconfig-tui). It all works just depends on which version you are comfortable with.
Authconfig
# authconfig --disablecache --enablewinbind --enablewinbindauth --smbsecurity=ads --smbworkgroup=DOMAIN --smbrealm=DOMAIN.COM.AU --enablewinbindusedefaultdomain --winbindtemplatehomedir=/home/DOMAIN/%U --winbindtemplateshell=/bin/bash --enablekrb5 --krb5realm=DOMAIN.COM.AU --enablekrb5kdcdns --enablekrb5realmdns --enablelocauthorize --enablemkhomedir --enablepamaccess --updateall
This will setup the necessary config files for both Kerberos and Samba. There is more config files to update from here.
Please Note: When I ran this I got an error with Oddjobd not being able to start. You can read the details in this post. Just make sure that the messagebus service is running.
Kerberos (/etc/krb5.conf)
Check that the file was generated and then add the relevant realms and domain_realm for your domain to the file. If you have multiple domain controllers you can add extra kdc lines like below.
[logging]
 default = FILE:/var/log/krb5libs.log
 kdc = FILE:/var/log/krb5kdc.log
 admin_server = FILE:/var/log/kadmind.log

[libdefaults]
 default_realm = DOMAIN.COM.AU
 dns_lookup_realm = false
 dns_lookup_kdc = false
 ticket_lifetime = 24h
 renew_lifetime = 7d
 forwardable = true

[realms]
 EXAMPLE.COM = {
 kdc = kerberos.example.com
 admin_server = kerberos.example.com
 }

DOMAIN.COM.AU = {
admin_server = domain.com.au
kdc = dc1.domain.com.au
kdc = dc2.domain.com.au
}

[domain_realm]
 .example.com = EXAMPLE.COM
 example.com = EXAMPLE.COM
 domain.com.au = DOMAIN.COM.AU
 .domain.com.au = DOMAIN.COM.AU
Save the file and test that it works using the kinit command.
# kinit someaduser
A password prompt will be displayed, type in the active directory password for that user and it should return to the prompt with no messages. You can then check that you have your kerberos ticket by running the klist command. It should output something like the following.
Ticket cache: FILE:/tmp/krb5cc_0
Default principal: [email protected]

Valid starting Expires Service principal
02/27/14 12:23:21 02/27/14 22:23:21 krbtgt/[email protected]
 renew until 03/06/14 12:23:19
Join the Domain
You’re now ready to join the machine to the domain. You can use the trusty net command to join the machine to the domain.
# net ads join domain.com.au -U someadadmin
You can test that this worked running the following command
# net ads testjoin
Join is OK
Console GUI
The other option to configure AD authentication is to use the console GUI version of authconfig. This will pop up a familiar looking interface (think console RedHat installer) that is pretty straight forward when it comes to configuration. Start the GUI tool
# authconfig-tui
You will get a screen like the following, make sure that only the items checked are the same as below.
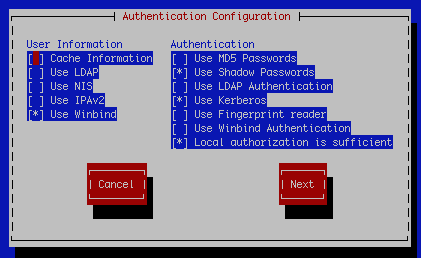
User Information
- Use Winbind
Authentication
- Use Shadow Passwords
- Use Kerberos
- Local authorization is enough
Make the above selections then next and you’ll be on the kerberos settings screen

Settings for this screen are as follows:
Realm: DOMAIN.COM.AU
KDC: dc1.domain.com.au,dc2.domain.com.au
Admin Server: domain.com.au
On the next screen you will find the Winbind Settings
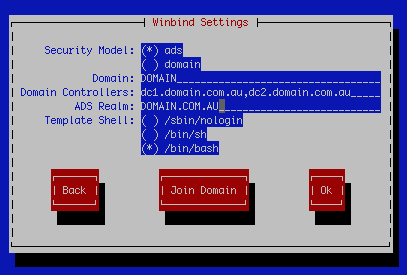
Settings for this screen are as follows:
Security Model: ads
Domain: DOMAIN
Domain Controllers: dc1.domain.com.au,dc2.domain.com.au
ADS Realm: DOMAIN.COM.AU
Template Shell: /bin/bash (you can change to sh if you’d like)
Select Join Domain
You’ll be prompted to save the details
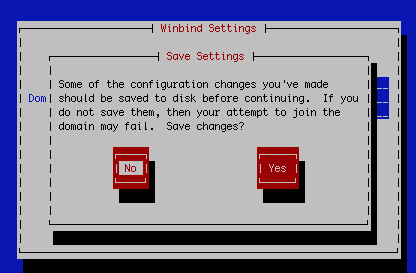
This will overwrite any other settings you would have had configured for this machine. You will then be prompted to provide domain admin credentials.
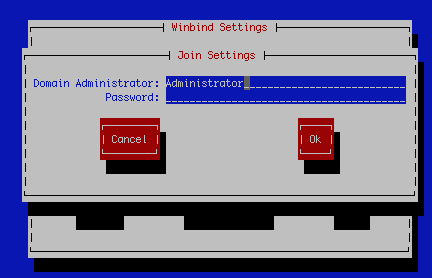
This will run the following command behind the scenes and then join you to the domain.
/usr/bin/net join -w DOMAIN -S dc1.domain.com.au -U Administrator
Note: If for any reason this doesn’t work in authconfig-tui. Select OK and return to the prompt and manually run the command above.
Home Directories
You don’t really need to do this step but I find it’s a nice clean way to make sure you separate domain users from your local users. Back in the authconfig step for the console configuration you used the following switch
--winbindtemplatehomedir=/home/DOMAIN/%U --enablemkhomedir
These switches enabled automatic creation of home directories. For this to work with the GUI version you will need to run authconfig with those 2 switches.
authconfig --winbindtemplatehomedir=/home/DOMAIN/%U --enablemkhomedir --update
This is telling oddjobd to put any new home directories at the path /home/yourdomain/username. You will need to create the /home/yourdomain path and make sure you’ve got your permissions correct. I’ll be using ACLs as you’re able to configure much finer grain permissions. ACLs ship with pretty much all modern linux distributions these days.
# mkdir /home/DOMAIN
# setfacl -m group:"Domain Users":rwx /home/DOMAIN
Please Note: There is a bug in oddjobd-mkhomedir that is creating the home directory with the 755 permissions which allows group and world to read every home directory. You can read the bug on Red Hats Bugzilla.
Restrict AD Logins (Optional)
In my environment I only want to allow the linux admins to use their AD logins to SSH to the servers I have configured. You can restrict which AD groups can login to the machine by adding the AllowGroups directive to the sshd_config and restarting sshd.
# echo 'AllowGroups linuxadmins' >> /etc/ssh/sshd_config
# service sshd restart
This will echo the required groups into the sshd config and then restart the service. This will now restrict ssh logins to those specific groups. If you’d like to configure AD access to more services you will have to check elsewhere. If I find the need to do this myself I’ll update this documentation to include it.
Comments
21 responses to “Active Directory Authentication with CentOS”
Hi Jamie, many thanks for the instruction and it worked for me as long AD server is up running. If AD server is off line, Linux client seemed to hang, no user (local & AD) can log in.
You know if there is caching solution such as sssd can be use so Linux client would still operates fine even though AD gone offline for days? If so, you know how to configure sssd to do this?
Regards
Hello,
Apologies for the delay in reply it’s been a busy holiday period for me this year. Local accounts should work no matter what unless you’ve got your AD priority higher than local.
It looks like it is possible to add SSSD to the mix. I found the following article that should help you get on your way with this.
https://fedorahosted.org/sssd/wiki/Configuring%20sssd%20to%20authenticate%20with%20a%20Windows%202008%20Domain%20Server
If you get this working please let me know. I currently don’t have time or the need for offline caching as I have half a dozen redundant DCs and don’t ever have AD offline.
What about with a laptop that has centOS on it? Need to be able to login when not connected to AD.
just use a local account?
Hi Jamie. Great tutorial. I did it all with no errors. kinit someaduser and net ads testjoin worked fine. no errors. However, after running everything, the AD users dont appear in /etc/passwd. Or anywhere, i checked with getent. again, kinit someaduser, work great! But I can not locally login or ssh with AD credentials.
Hi Brian,
It won’t create entries in etc/passwd and for some reason getent doesn’t work on my install either. Make sure that SSH config is correct so that you allow your users to login. Also check that your home dir script is doing what its supposed to. Login as root and tail your logs to see what errors you’re getting. I doubt it will be an Auth error and more a home dir/access error.
cheers,
Great Article!
I was able to kinit someuser and klist without errors. I would like to have our AD users to ssh into the CentOS box. When I attempt that, i receive an access denied message. If I try to change to an AD user from inside the box I get “su: user does not exist.” Do I need to have UIDs and GIDs set in AD under the Unix Attributes for that? Is it necessary just to enable authentication on the box? Thanks!
Hello,
Depending on what kinds of interactions you want your AD users to have with your servers the easiest is to do the option parts of my write up. Add the domain users you require to the sshd_conf and then only the AD users in those group(s) can login. The version I have above removes local accounts from being able to login so you’d have to modify it if you want both. With regards to su you can just add the same AD groups to your sudoers file.
cheers,
Create and easy way!
I have not yet tried to do it, but would like to have a question exactly related to what you have mentioned above. If I ignore adding a group to the sshd_config file, does that mean local authentication is still valid ?
I’m afraid of being looked out, so that’s why I want to make sure local authentication is still valid.
Just make sure you have local account/group in the sshd_config before trying this 🙂
If I remove a user from linuxadmins security group, they are still able to log on. groups command still lists linuxadmins and never updates the group membership. Using CentOS 6.6 and samba3 (Azure image). Is this a bug? Is there a better way to restrict login based on AD security groups?
This may be a bug. Does getent and wbinfo return the updated results? What version of samba 3 are you using? There was a bug in older versions of 3 but I’m sure that was fixed.
Thanks! After much googling, I found out that samba is caching group mappings in /var/lib/samba/netsamlogo_cache.tdb and there is no way to update it without having a successful authentication onto the client server. This seems to be a design decision by the samba team for trusted domains. However, that totally defeats the purpose of managing access through group memberships. If I remove a user from the linuxadmins group, that user will still be able to log in “one last time” and do whatever he/she wants. I could schedule a cron or puppet job to delete that file and restart winbind, but that’s not a very elegant solution from a management perspective.
I decided to go a different route. I used adcli+sssd instead of winbind. By setting the entry_cache_timeout = 900 parameter in the sssd.conf file, I was able to force refresh of group membership every 15 minutes without any manual intervention on the client server.
Is great ! it works fine
Hello,
Thank you for the great tutorial. But I have a question. I can login via terminal and su as AD user and everything loos fine except if I set the last step – group for SSH nobody can login via SSH. Even local root. Have you seen such issues?
P.S.: without it root and AD users can login centos
Hello,
You need to ensure that you have your local accounts in the groups when you modify your sshd_config otherwise it’ll lock you out.
I’ll update the article to put in a note about this.
cheers,
Great article, thanks.
Had to make some small modifications here:
# setfacl -m group:”Domain Users”:rwx /home/DOMAIN
setfacl: Option -m: Invalid argument near character 7
# setfacl -m group:\DOMAINdomain users:rwx /home/DOMAIN
Also noticed that some of the GUI images don’t match the original command line, so while I originally used authconfig-tui, I eventually just used the command line. For example, –enablewinbindauth is recommended by the command line, but the GUI image does not show it as selected.
I have done this and i can kinit with a domain user. But I can’t login into the desktop enviroment with that user. What do I need to do to allow that?
thanks.
Exist a problem with the /etc/samba/smb.conf, follows example for the perfect functioning, after, add permission for your group of Active Directory in /etc/sudoers(follows in end, after example)
[global]
workgroup = DOMAIN
passdb backend = tdbsam
kerberos method = secrets and keytab
realm = DOMAIN.COM.BR
security = ADS
template homedir = /home/%D/%U
template shell = /bin/bash
winbind refresh tickets = yes
interfaces = eth0 # Change the network interface
bind interfaces only = yes
encrypt passwords = true
auth methods = winbind
allow trusted domains = no
winbind use default domain = yes
winbind offline logon = yes
winbind enum groups = no
winbind enum users = no
idmap config * : backend = rid
idmap config * : range = 5000-200000
restrict anonymous = 2
name resolve order = host
syslog only = yes
domain logons = no
preferred master = no
local master = no
domain master = no
load printers = no
winbind max clients = 100000
#######################################################
In /etc/sudoers:
Add line in end of file(for it, use the command “visudo”):
%mygroup-it-ssh-linux ALL=(ALL:ALL) ALL
Observation: The “mygroup-it-ssh-linux” is the name of your group in Active Directory.
Thanks!
Hello,
I have a problem :
The users can log on the server by typing su – username on my linuxadmin AD but when i disconnect all and try to log in via ssh putty that’s return me a wrong password for my user AD..
I’ve already added my linuxadmin on my ssh_config.
What’s wrong with my config please?
Thanks.
[…] them here. Hopefully it is of use to someone. The majority of the experience is thanks to this […]