This guide will walk you through setting up n8n, a powerful workflow automation tool, on Ubuntu with Cloudflare SSL. I’ll show you both the manual process and provide an automated script solution.
Manual installation process
The manual installation process will take you step by step through the procedure to install and configure n8n on your Ubuntu VPS. There are a few things you’re going to need. There are two parts you’ll need to configure, your VPS and your Cloudflare account.
Prerequisites
- VPS
- Ubuntu 20.04 or later
- A domain name
- Cloudflare account with your domain added
- Basic command line knowledge
I have VPS’s hosted with DigitalOcean, Vultr and Hostinger.
1. Initial server setup
# Update system packages
sudo apt update && sudo apt upgrade -y

# Install required packages
sudo apt install -y curl wget git nginx certbot python3-certbot-nginx htop dnsutils
2. Configure Cloudflare
- Add your domain to Cloudflare
- Set up DNS A record pointing to your server’s IP
- Enable proxy (toggle)
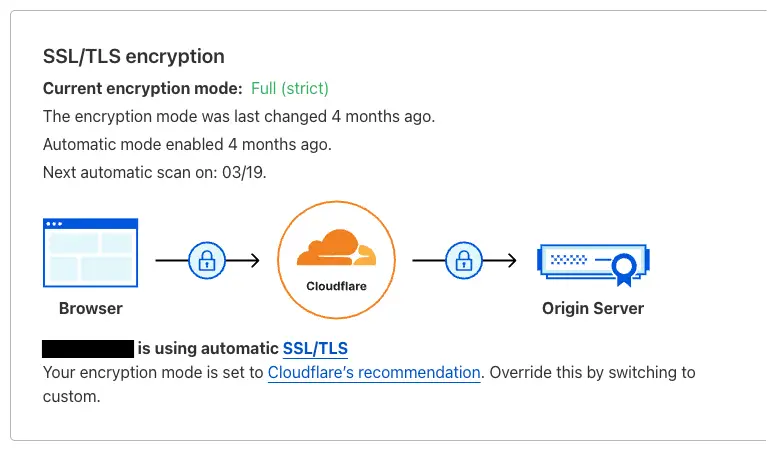
- Go to SSL/TLS settings for the domain:
- Set mode to “Full (Strict)”

3. Install Docker
# Install prerequisites
sudo apt-get install -y ca-certificates curl gnupg

# Add Docker's GPG key
sudo install -m 0755 -d /etc/apt/keyrings
curl -fsSL https://download.docker.com/linux/ubuntu/gpg | sudo gpg --dearmor -o /etc/apt/keyrings/docker.gpg
sudo chmod a+r /etc/apt/keyrings/docker.gpg

# Add Docker repository
echo \
  "deb [arch="$(dpkg --print-architecture)" signed-by=/etc/apt/keyrings/docker.gpg] https://download.docker.com/linux/ubuntu \
  "$(. /etc/os-release && echo "$VERSION_CODENAME")" stable" | \
  sudo tee /etc/apt/sources.list.d/docker.list > /dev/null

# Install Docker
sudo apt-get update
sudo apt-get install -y docker-ce docker-ce-cli containerd.io docker-compose-plugin
4. Setup SSL Certificate
- Go to Cloudflare Dashboard > SSL/TLS > Origin Server
- Create new certificate (15-year validity)
- Save the certificate and private key
- Create directory for certificates and then create the certificates
sudo mkdir -p /etc/nginx/ssl
sudo nano /etc/nginx/ssl/your-domain.pem    # Paste certificate
sudo nano /etc/nginx/ssl/your-domain.key    # Paste private key
5. Configure Nginx
sudo vi /etc/nginx/sites-available/n8n.conf
Add this configuration:
server {
    listen 443 ssl http2;
    server_name your-domain.com;

    ssl_certificate /etc/nginx/ssl/your-domain.pem;
    ssl_certificate_key /etc/nginx/ssl/your-domain.key;
    ssl_protocols TLSv1.2 TLSv1.3;

    ssl_ciphers ECDHE-ECDSA-AES128-GCM-SHA256:ECDHE-RSA-AES128-GCM-SHA256:ECDHE-ECDSA-AES256-GCM-SHA384:ECDHE-RSA-AES256-GCM-SHA384:ECDHE-ECDSA-CHACHA20-POLY1305:ECDHE-RSA-CHACHA20-POLY1305:DHE-RSA-AES128-GCM-SHA256:DHE-RSA-AES256-GCM-SHA384;
    ssl_prefer_server_ciphers off;

    location / {
        proxy_pass http://127.0.0.1:5678;
        proxy_set_header Connection 'upgrade';
        proxy_set_header Upgrade $http_upgrade;
        proxy_http_version 1.1;
        proxy_set_header X-Real-IP $remote_addr;
        proxy_set_header X-Forwarded-For $proxy_add_x_forwarded_for;
        proxy_set_header Host $host;
    }
}

server {
    listen 80;
    server_name your-domain.com;
    return 301 https://$host$request_uri;
}
6. Setup n8n with Docker Compose
mkdir -p /opt/projects/n8n
cd /opt/projects/n8n

vi docker-compose.yml
Paste the following into the yaml file.
version: '3'

services:
  n8n:
    image: n8nio/n8n
    restart: unless-stopped
    ports:
      - 5678:5678
    volumes:
      - n8n-data:/home/node/.n8n
    environment:
      - N8N_HOST=your-domain.com
      - N8N_PORT=5678
      - N8N_PROTOCOL=https
      - WEBHOOK_URL=https://your-domain.com
      - GENERIC_TIMEZONE=Your/Timezone
      - NODE_FUNCTION_ALLOW_EXTERNAL=axios

volumes:
  n8n-data:
7. Start n8n
docker-compose up -d
Automated Installation
If you’d rather not go through all these steps manually, I’ve created an automated script that handles the entire installation process.
👉 Check out my GitHub repository for the automated installation script.
The script handles:
- System updates and dependencies
- Docker installation
- Nginx configuration
- Cloudflare SSL setup
- n8n deployment with Docker Compose
- All necessary security configurations
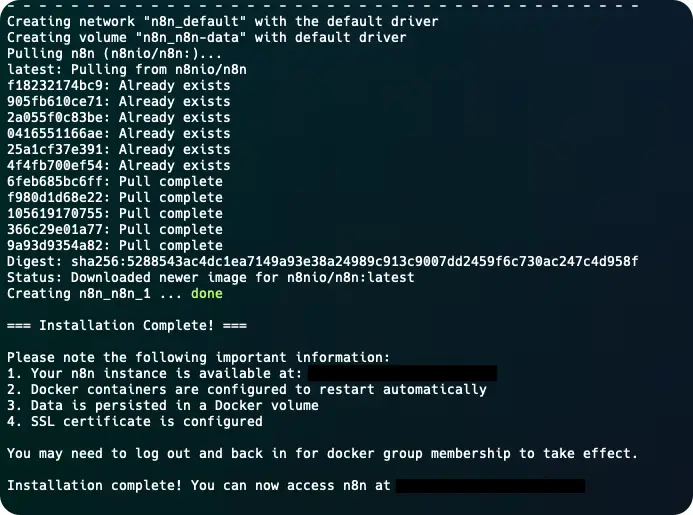
Using the Automated Script
- Clone the repository to your server
- Make the script executable
- Run the script and follow the prompts
git clone https://github.com/digitalchild/easy-server-scripts
cd easy-server-scripts
chmod +x n8n/install-n8n.sh
sudo ./n8n/install-n8n.sh
Conclusion
While the manual process gives you full control over each step, the automated script saves time and reduces the possibility of errors. Choose the method that best suits your needs and comfort level with server administration.
Remember to regularly update your system and back up your n8n data!